Showing posts with label Main course. Show all posts

Thursday, August 13, 2015

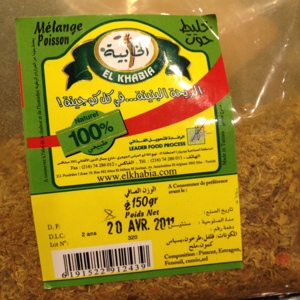
Pomfret with Bihari Kabab Masala


Ingredients

Garlic - 6 cloves
Ginger - 2 tbsp, grated
Bihari Kabab Masala (or Fish Masala, I used a spice mix from
Tunisia gifted by dear Kavita) - 2 tbsp
Garam Masala - 1/2 tsp
Salt - as per taste (approx. 1 tsp)
Turmeric - 1/2 tsp
Canola oil - 1 tsp

White Pomfret Fish - 2 (Silver one, cleaned with side cuts)

Method

Marinade uniformly the defrosted (if you use it fresh, it is much more flavourful) room temperature fish. Make sure some of the marinade gets into the cuts on the side of the fish.

Keep it aside for about 15-30 mins.

Preheat oven to 375 degrees F.

Bake at 375 degrees F for 20 mins.
Broil on High for 5 mins.

Serve hot, fresh off the oven with sliced Onion and Tomato slices. I think Green Coriander Chutney will also go great with this - try it out!


I remember eating Baked Fish in Kabob Factory, Bhubaneswar with hot Coriander Chutney and it was a very different but appetizing taste.

My friend Edgar had mentioned Corn Bread will also go great with this dish. Liked this idea and will definitely have Corn Bread as a side-dish with the baked Fish!


Saturday, April 12, 2014

Jungfrau, Switzerland and Traveller's Khichdi!

Note - This post was in draft for more than 2 years now! :)

Day 3

We stayed over in Interlaken to take the morning train to Jungfrau. We went via Lauterbrunnen to Kleine Scheidegg. This ride is also scenic - picture postcard like!

Lauterbrunnen valley - oh so scenic!

Near Wengen - looks like a painting, is n't it?

Kleine Scheidegg - where we change trains to catch the luxury special train to Jungfrau!

Jungfrau view

Jungfrau view - the tour ends there where you can see the tiny people below..we did not realize that we will also reach there! :)

View from Jungfrau

Jungrau range

View from where the tiny people in the picture above were being seen.

As we walks towards the ice sculpture exhibition

Ice Sculptures...just wow!

Up in Jungfrau we found this Indian restaurant - Bollywood
Indian restaurant in Jungfrau...
Chicken Curry, Rice and Papadum in Jungfrau Restaurant
Chocolates in Jungfrau Restaurant
View on our return ride to Kleine Scheidegg - a surprisingly beautiful ride comes to an end!

My desire to see a film shoot in Switzerland came true! What if it is not a Bollywood movie, it was an Asian movie. If anyone knows which movie this is, please share.

Pretty, ain't it? I can almost imagine a Bollywood song being shot here with the heroine is a soft-colored Chiffon saree serenading the heroe! :)))

Ingredients

Rice - 1.5 cups
Turmeric - 1 tsp
Chilli Powder - 1/4 tsp
Garam Masala - 1/2 tsp
Cumin seeds - few pinches

Mix them all together in a zip-loc bag and seal it.
If you can, I recommend to carry a small bottle of hot pickle to serve as a side-item with this Khichdi.Or Papads can be roasted on the stove!

In your destination, remember to add the following to your grocery list as well as some pickle if you did not carry it.

Canned\Frozen Vegetables - 1 to 2 cups
Butter - 2-3 tbsp(You can use Canola Oil if you have that available - when traveling, I usually buy Butter only since we need that for breakfast - serves double purpose.)


Method

Heat a pan and add Butter.
As it melts, add the veggies and cook them in Medium heat.

When the veggie is cooked, add the Rice-mix and mix well. Cook the Rice and Veggie mix like this for another 5-10 mins till the Rice looks translucent.

Add about 4 cups of water and let it boil in High heat.
After the water boils, reduce the heat to Medium and cover the dish. It should be done in the next 5-10 mins. Serve hot with Pickle\Papad. Add a dash of butter on top if you like.

Saturday, December 29, 2012

Langostino Pasta with Vodka Sauce

Happy New Year, 2013, to all my readers and followers! :)
Enjoy this one-pot wonder! 


Ingredients

Shell pasta - 1 cup, raw

Canola oil - 2 tbsp
Vodka Sauce - 8 tbsp (Bertolli brand)
Brown Mushroom - 8-10, small, remove the stalk and slice the head
Onion - 1 medium, sliced
Tomato - Cherry or Medium sized ones, chopped into halves

Langostino (recently found this in Costco near the Shrimps counter!)  -  1/2 cup to 1 cup, depending on taste.
meat of the squat lobster, which is neither a true lobster nor a prawn. It is more closely related to porcelain crabs and hermit crabs. Crustaceans labeled as langostino are no more than 3 inches (7.6 cm) long, and weigh no more than 7 ounces (200 g). Langostinos are not langoustes (spiny lobsters) despite a similar name (in Spanish, lobster is called langosta). Also, langostinos are sometimes confused with langoustines (Norway lobster), which is a true lobster common in European cuisine. (Source: Wikipedia link)
Chilli Powder - as per taste, just to whet my appetite for hot food - you can avoid this!
Salt/Pepper seasoning - as per your taste


Process

Cook the Pasta as per the instructions on the packet. I usually add a little Salt and a few drops of oil in the boiling water for the Pasta to absorb the Salt and to remain separate respectively.

Drain the cooked Pasta and keep it aside.

Heat Canola Oil.
In High heat, cook the Mushroom and Onion.
When half-done, add the Cherry Tomatoes.
Add the Vodka Sauce, Pasta and the Langostinos and toss well for the sauce to mix well.

Season with Salt, Pepper and Chilli Powder (optional).

You can replace the Langostino with Shrimp (any size) or shredded Chicken. It is best to make this for one person at a time - beauty is in the detail! Uber-delicious! :)

Saturday, September 22, 2012

Small Fish Fry


Ingredients

Medium sized Fish - 3

Garlic - 4-5, crushed finely
Salt - 1/2 tsp, or as per taste
Turmeric - 1/2 tsp
Chilli Powder - 1/4 tsp, or as per taste
Fish Seasoning - 1 tsp (Shan brand)

Canola oil - 1 tsp in the marinade + 2-3 tbsp for shallow frying

Method

We got the fish shown in the pic in pack of three and frozen from Indian store in New Jersey. New Jersey Indian stores carry frozen fish now. We bought from the one near East Brunswick (sorry, don't remember the name!)

Unpack the fish and wash in water to wash away the ice and defrost the fish.

Mainade the fish with the rest of the ingredients mentioned above.

Let it sit aside for about 15-20 mins.

Heat a flat skillet. Add the oil for shallow frying using Medium heat and let it warm up so that as you add the marinated fish, the fish should sizzle.

Let it cook one side in Medium heat - takes about 5-10 mins. Turn it and let the other side cook.

Once both the sides are cooked, you may decide to cook either side in High heat for a few mins to make the fish crispy in the exterior. Keep a close watch - as long as you don't like "burnt" fish! :)

Serve with a slice of lime and thinly chopped Onions. Serve hot.

Wednesday, August 29, 2012

White Bass - Baked with Tunisian Fish Spice Mix


Prepare the marinade mix with Salt and Turmeric.

Add 2-3 tsp of fresh lemon juice to cut the "fishy" after-taste. I forgot to add this and the "fishy" after-taste was there in my preparation - don't like that! Maa said even Vinegar can cut that after-taste.


Add 4-5 cloves Garlic, freshly crushed.


Add about 3 tbsp Tunisian Fish Masala mix that my dear friend Kavita carried for me all the way from Tunisia - that was so very thoughtful and a perfect gift for me. Thanks, dear - I always cherish our friendship!

Marinade the fish in room temperature. Let it sit aside for 30 mins to 1 hr.

Heat the Oven at 375 degrees F.

Bake the fish for about 25 mins. Keep close watch if you need more or less time.


Broil the fish for the crunchy exterior for about 5-10 mins. Keep close watch if you need more or less time.


Fyi for DC suburb folks - We got the White Bass from Lotte Plaza - number 3 cleaning! 

Saturday, August 25, 2012

Easy fix Puliogare aka Tamarind Rice

I should credit my dear friend Siri for introducing me to this quick and delicious dish. She had made it for my first road-trip here with her and a few other friends - that taste still lingers on. Thanks, Siri, for the camaraderie! :)


This is an easy-fix wholesome dish for lunch or work-tiffin box. Whenever I have leftover rice, this is another dish I like to whip up for work lunch-box. These days, I try to limit my rice intake for lunch hours and this dish works out perfectly.

I use the branded store-bought Tamarind Rice mix. I like the MTR brand because of their quality and authentic taste.


Heat 1/2 tsp of Canola oil.
As it warms up, add a few cumin seeds and chopped fresh 1-2 green chillies.
Add 2-3 tbsp of the Tamarind Rice paste\powder.
I usually add a half-cup of chopped Peanuts separately as well even though the spice mix usually includes a fair share of ground Peanuts.
As the flavors are imparted and the spice mix looks mixed well with the oil in 3-4 mins, add the room-temperature cooked Rice.
Mix well. Cover for 5 mins for the flavors to inter-mingle!

Serve with hot Cucumber Raita or Papad.

Wednesday, August 22, 2012

Nadiya Rasa dia Chingudi Tarkari (Shrimp in Coconut Milk Gravy)


Ingredients

Shrimp (Chingudi in Odiya, peeled and deveined) - about 30-40
Salt - 1 tbsp
Turmeric - 1 tbsp
Chilli Powder - 1 tsp

Marinate the Shrimp with the above spices for atleast 30 mins. Depending on temperature outside, you can keep it back in the fridge after coating it well. Cover it with a seal-wrap.

Take a flat heavy-bottomed pan.
Heat 2-3 tbsp Canola Oil in Medium heat.
As it warms up, add the Shrimp in a layer and let it half-cook on one side. You will get a beautiful Orange color. Turn it over and let it cook the other side. You don't need to fully cook it since it will also cook in the curry later. Depending on pan size, you will never to shallow fry the Shrimps in multiple batches. To let you in on a secret, I sometimes fully cook a few of these babies and have them as-is. They taste awesome! Ah, if they are the fresh Prawns of Odisha, I can't imagine you not doing this... :)
Keep them aside. You don't need to place them on paper towel since it is tasty to add the oil back to the curry later.


I use my regular Onion/Tomato/Green Chilli/Ginger/Garlic curry paste to prepare this. It is roughly 2-3 Medium Onions, 2-3 Medium Tomatoes, 2-3 Green Chillies, 1 inch Ginger, 6-7 Garlic Cloves with as little water as possible.

No need to clean the pan used for frying the Shrimp. I reuse the same pan in order to not lose out on any of the flavors - that is why it is a good idea to use an appropriate dish when you start frying, something that can hold the curry while cooking.

Heat 1 tbsp Canola Oil or lesser if the pan still has some oil from the above shallow frying process.
Add 2-3 dry Bay leaves, 2-3 dry Red Chillies, 1-2 Cinnamon stick and 1/2 tsp Cumin Seeds.
As the above whole spices sizzle, add the ground paste of Onion/Tomato/Green Chilli/Ginger/Garlic.

As the curry paste is half-cooked, add a little more oil if required. I try to add a dash of water instead and it usually helps continue the cooking process without burning the curry paste and without the need for the  added oil.

Add 4-5 tsp of Curry Powder, 1 tsp of Coriander Powder and 1 tsp of Garam Masala.
Adding a dash of Paprika Powder gives it a bright color.

10 minutes before you stop cooking, add 1/2 to 1 cup of Coconut Milk (I use canned ones and this is called Nadia Rasa and thus, the name) and mix well. The color is further enhanced with the addition of the Coconut Milk which gives it a nice golden color.


Enjoy with Rice\Roti\Naan anyday!

Funny note - Back home, little babies are also affectionately referred to as Chingudi! LOL!

Thursday, August 16, 2012

Khada Saga Bhaja

Ask any Baripadia (yes, I wear that hat too!) about Mudi - Saga Bhaja (Puffed rice with Stir-fried Greens), you will suddenly find them in a tranquil space! I can start smelling the garlic infused greens..and am transported to the mornings at my parent's house where this is one regular breakfast item!

But it is a bit of trouble for my mom and aunts..coz back home, my Dad and Uncles prefer to get the green freshly plucked in the morning which means they have to be delicately cleaned and individual leaves removed and cut (a time consuming process) quickly enough to prepare it in time! Maa - you rock! :)


I recently found these greens that look like Khada Saga at our grocery store with somewhat larger leaves but oddly enough, it tasted and felt just like Khada saga. I threw away the wrapper before noting the name and also forgot to take pic..but making a note to self to note the same in my next purchase!!

Heat 2 tbsp Canola oil.
Add 1 tbsp Mustard oil.

Peel and crush 1 pod of Garlic - this dish is only flavored by Garlic, so we add lots. It is not a typo - we do add one entire pod of Garlic - the more, the better!!
As the oil sizzles, add the Garlic and 5-6 dry Red Chillies. Mix it well with the oil and cook for about 2-3 mins till the Garlic turns slightly translucent.

Add the chopped greens in batches and mix them well. The greens reduce a lot. Cover them briefly to fasten the cooking process.

I will toss and turn them till they get evenly reduced. After I have managed to get all the greens in the pan, I will cover them in Medium heat for it to cook well and lose the raw taste.

Remember to add Salt as per taste when the greens are half-cooked.


Note - We do not use Turmeric in this stir-fry.

Maa likes to toast 'Badi' (Urad dal fritters hardened in sunshine and stored for later use) and add them to this.

Oh, I forgot but this tastes great if you chop Brinjal\Eggplant into tiny 1/2 inch pieces and cook them in the oil before adding the greens. It gives the dish more volume.

Since I was serving this akin to Collard Greens with my Burger dinner menu, skipping the Eggplants was ok. It tasted great either ways!! :)

Enjoy and have a great time!!

Wednesday, August 8, 2012

Bhendi Bhaja


Another one in the "Bhaja" aka "Shallow fried" series. Ladies-finger was not in my list of favorite foods for a long time. I tried making it once right after I arrived in DC after wedding and hated the slime associated with this veggie - of course I did not know how to work around it!

When my mom and dad were visiting me for the first time, Maa made it and I loved it even more than the non-veg preparations. Ever since, this is a definite item in my grocery list. So the trick to use it is to clean it before chopping and wipe it dry. Then cut it as required with quick brisk cuts and stir-fry them till the sliminess vanishes. I either cut them into pieces as shown in the pic or into long slices. Love it either way and keep making them inter-changeably.


  • Heat 1 tbsps Canola oil. 
  • Add 3-4 dry Bay leaves, 2-3 dry Red Chillies and a pinch of Cumin seeds and let them sizzle. 
  • Add the chopped Lady Fingers (about 20-30 medium-sized ones - I pick the soft to touch ones - Use your civic sense and please don't break them to select for shopping though that is the best way to determine good ones! If you break them, buy them - don't leave them for others - ewe!). 
  • Add Salt as per taste and 1/2-1 tsp of Turmeric Powder.
  • Stir fry in High Heat till it looks half-cooked and the spluttering of oil stops.
  • Cover them for 2-3 mins for it to cook well. 
  • Based on how you like them, cook in High heat for added crunchiness and Low heat for softer ones. 

Serve it as a side-dish with Rice or Roti. I usually like them with Rice\Dal or Rice\Mutton Curry or Rice\Fish curry. Enjoy!

A similar Bhendi Bhaja recipe was posted here earlier on.

Saturday, July 28, 2012

Stir-fried Brocollini and Sweet Bell Peppers


Ingredients

Brocollini - an entire bunch that consists of about 10-15 stalks - remove the leaves
Sweet Bell Pepper - about 10 - remove the stalk and chop into half
Onion - finely chopped or long slices, as per your preference
Toasted Sesame Seeds - 1-2 tbsp

Salt - as per taste
Pepper - 1/2 tsp
Ajinomoto - a pinch
Soya Sauce - 1 tsp
Worchestire Sauce - a few drops
Chilli Powder - optional, as per taste
Sugar - a pinch

Canola oil - 1-2 tbsp


Method

Heat Canola oil.
Add the chopped Onions and let them cook in High heat till they become translucent.
Add the cleaned Brocollini and continue cooking in High Heat for a minute or two. Cover it for 2-3 mins for the stalks to cook and the fresh green color to develop.
Remove the cover and continue cooking.
In a small container, toast the Sesame seeds oil-free and keep them aside. Keep a close watch on them while toasting as they easily brown.
Add the chopped Sweet Bell Peppers and the rest of the ingredients.
Depending on how crunchy you like your veggies, stop cooking appropriately.
Eat it immediately while the veggies are still sizzling.


We had ours as a whole dish by itself and it was quite filling. I am now encouraged to try this with different vegetables! :)

Wednesday, July 25, 2012

Janhi Poda

Janhi aka Ridge Gourd
Ingredients

1 Medium Ridge Gourd aka Janhi (Odiya), skin removed
1/2 Small Onion, chopped finely
1 Green Chilli, chopped finely
Heavy Cream - 1/4 cup

Method

Preheat oven to 400F.
Bake the peeled and cubed into large pieces Janhi for 20 mins.
Remove from oven and keep it covered.
Dab a paper towel on the Janhi to remove the excess water so that the final dish will be less watery than shown in the pic. I missed this step.
Cut the baked Janhi cube into tiny pieces.
As it cools down, add the Onion, Green Chilli and Heavy cream. Mix them together.
Add Salt as per taste and mix again.


Serve as a side-dish with Rice/Roti - some like it with the Odiya summer food Pakhala as well.

This is Maa's recipe. She makes it often for lunch as a side-dish. I bought Janhi after ages since I don't like peeling it. And I remembered this dish - so of course in the next phone call, I was asking her for the recipe even before anything else. First bite into the dish made me nostalgic - the flavors transported me back to the sunny afternoons of my childhood - alas, those days will never come back! Never.

Tuesday, July 17, 2012

Vegetarian Chili with Guacamole

Vegeterian Chili with Guacamole
Avocado and Guacamole are synonymous for me. When I am talking about Guacamole, I should admit that I have mentally check myself that I am not saying Avocado! In the past, I would get Gua.. eh, Avocado and could not know how to determine it was ripe and would eventually end up spoiling it. Not good - so this time in my latest frenzy of trying out new vegetables, I was determined to not repeat Avocado history @ Pragyan's.

From the grocery store, I picked up the toughest to touch Avocado and brought it home to store immediately in the refrigerator. On checking the next day, it was still tough to touch. Same story the day after as well. Time to google - learned that I should leave it outside in a brown bag to ripen. Left outside for two days, they were soft to touch but not squishy. Immediately moved it back to the refrigerator and it stayed good for three days before I remembered about them again! Lucky - they were still good. And I got to enjoy my FIRST home-made Guacamole!! (as I usually say, drum rolls and trumpet please! ;))

Info from the link "How to ripen Avocados?"
  • Place 2-3 avocados in a brown paper bag and store at room temperature. If you don't have paper bags on hand, wrapping them in newspaper will also do.
  • For even quicker ripening, add an apple or a tomato to the bag.
  • Check daily to see if avocados are ripe yet. Don't just judge by their color, as some varieties will retain their green color, even when ripe, rather than turning a deep greenish brown.
  • Ripe avocados will peel easily and are soft, yet still firm and not squishy.
  • Extra Tip: If your avocados are ripening before you have a chance to eat them, place them in the crisper of your refrigerator, as this will help them keep a bit longer once they are ripe.
 To cut the Avocado, put the knife through till you hit the core seed. Circle the knife through the entire diameter. And then slowly tug one-half to pull it apart. To remove the core, slowly hit the core and get the knife caught in it. With a slight tug, the core will come apart. Loved this part of cutting this vegetable! :) Next using a spoon, core out the flesh from the skin and you will have them apart as shown in the pic below. Immediately squeeze some lime juice on the Avocados to prevent them from browning and thus, oxidizing. I used the shells as containers to serve the Guacamole - they looked very pretty! :)


Here is the Guacamole recipe that I followed with slight modification as per our taste preference and availability of ingredients.

Ingredients

    1 Avocado, halved, seeded and peeled
    1 Lime, juiced
    1/2 teaspoon Salt
    1/2 teaspoon ground Cumin-Chilli Powder (Link)
    1/2 medium onion, diced
    1 Medium Tomato, seeded and diced
    1 tablespoon chopped Cilantro
    1 clove garlic, minced

Method

In a large bowl place the scooped Avocado pulp and Lime juice, toss to coat.
Add Salt and Cumin-Chilli powder. Mash them roughly. I like to have good chunks of Avocado in my Guacamole. Mash them as per your preference.
Fold in the Onions, Tomatoe, Cilantro, and Garlic.Mix well softly.
Wrap the container in plastic wrap to prevent further oxidation of the Avocados, if you are not eating them right away. Enjoy them with Chips, Tacos, etc - I enjoyed mine with Chili and they tasted awesome together!

Homemade Guacamole

The Chili recipe shown below is a modification of this recipe, again as per our taste preference and availability of ingredients.The addition of Yellow Squash to this recipe gives it a slightly sweet taste which I relished a lot.

Ingredients

1 Medium Onion, chopped
3 cloves Garlic, minced
1 tbsp Canola oil
2 Medium Tomatoes
3 tbsp Tomato sauce
1 tsp ground Cumin-Chilli Powder (Link)
1/2 tsp Black Pepper powder
1 medium Yello Squash, chopped into not too tiny pieces
2-3 cup water
1 cup Red Kidney Beans, soaked overnight and pressure-cooked in Medium-High heat for one whistle and cook five minutes thereafter in Medium heat
2-3 tbsp fresh Coriander leaves

Method

In a heavy-bottom utensil, heat Canola oil.
Add chopped Onion and Garlic until tender, stirring occasionally.
Stir in chopped Tomatoes, Tomato sauce, Cumin-Chilli powder, Black Pepper.
When the Tomatoes are half-cooked, add the chopped Yellow Squash.
Mix them with the rest of the mixture and let it cook for 5 mins.
Add water and bring it to a boil.
Reduce heat and let it simmer covered (note!), for 10 minutes. I used the timer to be sure I was not overdoing it.
Stir in the cooked Red Kidney Beans.
Bring it to a boil again.
Reduce heat and let it simmer uncovered (note!), for 10 minutes.
Stir in fresh Coriander leaves.
Serve hot with the cool Guacamole as a side-dish!


Disclaimer - "This sponsorship is brought to you by Avocados From Mexico who we have partnered with for this promotion."