Showing posts with label Snacks. Show all posts

Tuesday, September 2, 2014

Modak

Modak prepared by my lovely friend aka sister aka partner-in-crime Vrinda for Ganesh Chaturthi!


Recipe link : http://www.aayisrecipes.com/sweets/modak/


Bon Appetite!

Saturday, July 6, 2013

Egg Chop \ Egg Pakora

This is another popular street food of Bhubaneswar. Not sure about the street flavors of this dish since I have always had it home-made. My MIL used to make it for my nephew and niece and they love it. During a recent party menu-planning, I remembered this dish and gave it a shot. It turned out quite well, to be honest. The only problem is you will have to make it as close to your eating time as possible, so that you enjoy it hot and crisp when the flavor is fully there. This is another kids-favorite recipe -enjoy!


Ingredients
Eggs about 12-15

Besan - 1.5 cups
Garam Masala - 1 tsp
Amchur - 1 tsp (or as per taste)
Salt - as per taste
Sugar - a pinch
Baking Soda - 1/8 tsp
Ajwain - a pinch (aids digestion of deep-fried food, prevents heart-burn)

Canola Oil - for deep frying 

Method

Layer the eggs in a saucepan and fill with cold water so the eggs are fully covered in water. Bring to a boil in high heat. Reduce heat to Medium and let it simmer for another 5 mins. Cover and keep aside for the eggs to continue cooking. When the container becomes room temperature or easy to handle, remove the water and peel the eggs. (This was Rachael Ray's tip for perfect boiled eggs.)

Chop the eggs into halves length-wise.

Make a batter of the remaining ingredients (except oil and baking soda). Keep the consistency thick so that it will stick to the slippery egg. Add the baking soda to the batter just before dipping the eggs in the batter and mix the batter well. Note - If there is more batter than you need, keep it aside before adding the baking soda; the batter lasts longer (one of my friend's mom's tip).

Heat the oil. Drop in one egg piece at a time gently so that the oil does not splatter and burn your hand, etc.

If there is time before you eat, keep it warm in oven at 175 degrees F. Don't microwave it else the egg may turn rubbery and the crispiness of the outer shell will no longer be there.

 
Serve with Tomato ketchup, slice of Onion and Lime. Chilli Sauce would also be a good accompaniment.

Wednesday, September 26, 2012

Belated Happy Ganesh Puja Chaturthi! With Kala Chana Sundal...

Ram Mandir Chowk Pandal shared by Discover Bhubaneswar FB Page
Belated Happy Ganesh Puja Chaturthi, everyone!

This is a post I wanted to make last Wednesday but due to certain factors, I could not. As usual, using the principle of "better late than never", I am here!

Ganeshji has been my favorite God since childhood. I remember when we were in Keonjhar, a beautiful scenic place in Odisha, I was about 4-5 years old and me and my dad were out shopping. I was enchanted by a picture stall where they had colorful pictures of different Gods. Amazingly, I still remember that clearly even after all these years - human brain is interesting, right? Here I can remember certain instances years and years later while sometimes I cannot what I had for lunch yesterday or what I did on the weekend when someone asks me on Monday! So, yes, I do remember that clearly - I insisted with my dad to purchase two framed pictures - one with Lord Ganesha and the other with Goddess Saraswati and Goddess Laxmi (think there was one more God or Goddess in this pic). Once we got them installed in the house, I used to religiously worship them.

When we moved to Bhubaneswar, I think those pictures got misplaced. Ganesh Puja and Saraswati Puja are huge in Odisha (Orissa in those days) - different clubs and associations will set up temporary structures (called "pandals") by taking donations (read "forced" donations from the neighborhood and anyone they can lay their hands on!). They are brightly lit podiums with the idol of the God - this is done by the guys only - maybe things are different these days, don't hold me on this statement.

Puja days meant new dress, no studies since you are not "supposed" to touch books on these two puja days (which kid will protest against this? well, I did a little coz this meant you can't even read story-books!) and visit the different pandals across the city in the evening. Back then, Bhubaneswar was so small that we could cover all the pandals if we wanted to. The city has grown to four times the size it was when I was a kid...

Ganesh is the God of learning and wisdom. Students pray to him more diligently than the rest to get good marks in their upcoming examinations. And any prayer to any other God will always begin with a prayer to Lord Ganesh. Wedding invitations have his picture - before you start anything good, it will be successful if you begin with a prayer to Him.

Over this Ganesh Puja, I made an early morning visit to our temple closeby. In the past years, I used to visit in evening which would be quite crowded. Liked the morning visit this time more due to ease of parking and less crowd. I wanted to make Rice-based Modaks this time but had to give up the idea.Next year, maybe. In the temple, I received the prasad of Laddoo and Kala Chana Sundal. Temple food is always different - atleast I feel so. I liked them both. Here is the recipe trying to replicate the Kala Chana Sundal.While in IIT Madras, there was a temple inside the campus and I had this prasad there for the first time.


Ingredients
Makes about 4-5 servings

Kala Chana - 1 cup, soaked overnight and pressure cooked with Salt as per taste and a pinch of Baking Soda for about two whistles and five minutes in Medium heat. Leave it covered till the pressure cooker opens by itself - that is, don't force it open.I love having some of this fresh out of the pressure cooker with a little bit of salt, chilli powder and chat masala - quick instant chat - try it out! :)

Canola Oil - 1 tbsp
Cumin Seeds - 1/2 tsp
Dry Red Chillu - 5-6, break into halves
Hing powder (Asafoetida) - a pinch
Salt - 1/2 tsp (or as per taste)

Fresh Coriander leaves - 2 tbsp (for garnish)
Grated Coconut - 2 tbsp (I used frozen grated coconut after reducing it to room temperature)

Method

Cook the Kala Chana as mentioned above. Keep it aside. Use immediately or keep it in the refrigerator till you are ready to use. Will stay good for 2-3 days but rather use it immediately. Bring it to room temperature before cooking.

Heat Canola Oil.
Add Cumin seeds, Hing and dry Red Chilli and let it sizzle.
Add the cooked Kala Chana and mix it well. I cook it in High heat for about 5 mins.
Reduce the heat to Medium and cook covered for another 5 mins.
Add chopped fresh Coriander leaves as well as the grated Coconut and mix it well.
Serve hot.


I will sometimes pack it and bring to work. Makes a great morning snack just warm. As well as a workday lunch - very nutritious and filling.

Some nice pics of Ganeshji that I came across in the Ganpati festival season that friends shared on Facebook are below - enjoy! Thanks, friends, for sharing these with me.

This is by my darling niece Pihu! How creative...loved this!!


Wednesday, August 1, 2012

Papdi Chat for London Olympics Inaugration!!


Papdi Chat is undoubtedly the Indian version of Salsa and Chips. The sweet and tangy flavors are always a pleasure to enjoy. Very easy to prepare and relish and thus, something I make when relaxing. While watching the London Olympics Inaugration last Friday evening, I was in the mood for some. Quickly boiled some potatoes and opened up a can of Garbanzon beans and the chat is ready to eat. I prefer to use the "soak overnight and pressure cook the Chana/Garbanzo" to get the cooked Garbanzo beans. However, I will always have some canned Garbanzo beans just for occasions/needs like these!


For clarification of people unfamiliar with the word Chat when used with a snack dish, it refers to a snack which is a mish-mash of various ingredients with sweet and tangy flavors. These are popular street-foods of India. With no concern for the hygienic quotient, we used to enjoy these in school and college days from the vendors right outside the campus gates. To be honest, no matter how much you try, you can never replicate those flavors! Even now when I reach India, Chat is one of the top items in my wish-list. And friends and relatives who try to make these at home to persuade me not to eat outside - well, that's a different story! ;) I am guessing Chat represent the Hindi word meaning "slurping away". Or that people catch up on gossip and exchange stories while eating it and thus, the name!

Ingredients

Cooked Garbanzo beans - 1/2 cup
Potato - 2 small, boiled and chopped
Onion - 1/4 of a large one
Green chilli - 1
Fresh Coriander leaves - few sprigs, chopped
Chat masala - 1/2 tsp

Salt and Chilli powder - adjust as per taste

Greek Yogurt - 2 tbsp mixed with 1/4 cup Water and Salt and Cumin-Chilli or Chilli powder (no need of Water if using regular Yogurt)

Papdi chips - 1 cup, spread in a plate (I use the store-bought ones, like the Garvi Gujarat brand for the same)

Method

Prepare the  Yogurt mixture with the spices as mentioned in Ingredients.
Boil Potatoes to cook them. Chop and keep them aside.
Mix the Potatoes with the rest of the ingredients. Keep some of the Yogurt mix to add later if someone needs extra watery mix of Potato-Garbanzo for their Papdi Chips.
Garnish with chopped Coriander leaves and light sprinkle of Chilli Powder (optional).


To eat, pick one Papdi and add a spoonful of the Potato-Garbanzo mix.

Enjoy the London Olympics - root for your athletes but savor the undying spirit and hardwork of each one of them. Let everyone have a great time - no one loses here!


Wednesday, July 11, 2012

Piyaji - Onion fritters

Ingredients 

Onion - 2 Large, chopped into thin slices
Besan / Gram flour - 2 cups
Ginger - 1 tbsp
Green Chilli - 2-3 or as per heat preference, chopped into tiny pieces
Ajwain - 1/2 tsp - this aids digestion
Turmeric Powder - a pinch for color
Baking soda - 1/8 tsp
Salt - as per taste
Water - to make the Besan batter


Canola oil - for deep frying


Cooking method

Mix all the ingredients except the Canola oil together. First try to mix without adding water. Add a tbsp of water at a time till you get the right consistency - it should not be runny at all so that you an hold small portions of the batter in hand and drop in the hot oil. Add the baking soda (Eno can also be used instead) during the last few folds of the batter.

Heat oil in a wide-mouth heavy-bottom container.

Put a drop of the batter in the oil and wait till the drop rises to the top. Then the oil is warm enough to put small portions of the batter to make the fritters.


We have it as an evening snack or as a side item for main-course. Love some fresh-chopped Onions with Tomato Ketchup\Green Chilli Sauce or some fresh Green Chillies. A dash of Rock salt makes it tangy!

Saturday, May 26, 2012

Bread Pakode ki Kasam...

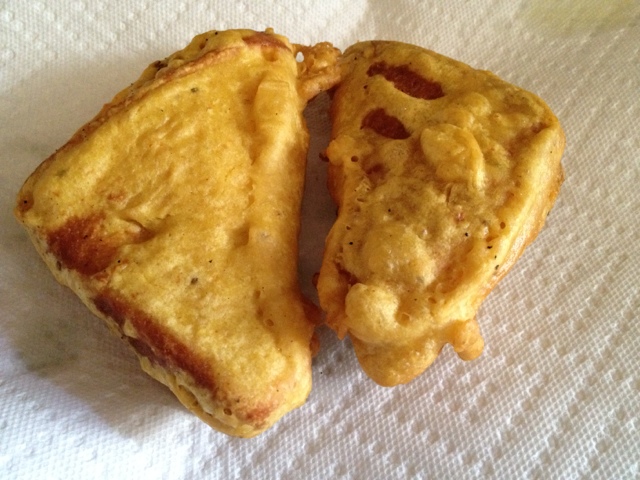
Bread Pakoda waiting to be devoured!

Anytime I watch the movie "Band Baaja Baarat" with Anushka devouring the Bread Pakodas, no matter what time of day or night, there is an immense craving to have some myself. The first time I had it was in my high school cafeteria (also remember their Rice-Cholley and Rice-Rajmah - have never had the same flavors anywhere else - they were a Punjabi couple who set up the much-needed cafeteria - wonder if they are still around?). This was also a Tuesday breakfast item in my undergrad mess - surprised that I even remember the day? Well, that was the only day I could make it in time for breaker - so who would not? I try to make it once in a month or two with the warm hot potato filling for Sunday brunch. If you ever need me to swear on something, this is it! :)

Ingredients for Potato filling

Potato - 6-7 medium sized, pressure cooked for 2 whistles and set aside
Onion - 1 medium, chopped
Green chilli - 1-2, as per taste
Cumin seed - 1/4 tsp
Salt - as per taste
Turmeric Powder - 1/2 tsp
Coriander Powder - 1/2 tsp
Canola oil - 1 tsp + few cups for deep-frying

Method for Potato filling

Heat oil. Add Cumin seed and let it sizzle.
Add chopped Green Chilli and Onion and let them cook till the onion turns translucent.
Add the mashed Potato.
Add a few tbsps of water and mix well Salt and Turmeric Powder.
Add Coriander Powder after a few mins. Mix well.
Cool it down slightly before you are ready to use it as a filling - just makes it easier to handle.

Ingredients for Besan (Gram Flour) Batter

Besan (Gram four) - 2 cups
Ajwain - 1/8 tsp
Salt - as per taste
Turmeric Powder - a few pinches, for the bright yellow color
Chat Masala - 1/4 tsp

Method for Besan (Gram Flour) Batter 

Mix everything using water. Depending on preference, you can make it thick or thin. I usually add about 2 cups of water. It's runny enough so that dipping the breads into it will make the batter stick to it (not just wet the bread and drip off!)

Method for Bread Pakora (pic steps)

Take a Bread slice.
Dab some Green Coriander Chutney - I use the store bought bottled ones. (optional)


Bread with Green Chutney

Spread thinly the Potato filling.

Bread with Green Chutney and Potato filling

Fold the bread in triangle or rectangle - either works! Triangles look better! :)

Bread with filling - ready to be fried!

Heat the Canola oil for deep frying. Using fresh oil is always preferred but feel free to reuse older frying oil, as long as it has not smoked in the past.
Dip the prepared breads above in the Besan (Gram Flour) batter. Make sure the bread is well coated with the batter and deep fry. Wait for one side to be done before turning it over to cook the other side. It takes a minute or two to get each side done.

We usually start eating after the first batch is out. :) Enjoy with Date-Tamarind Chutney and/or Tomato Ketchup!

Bread Pakoda with Tomato Ketchup and Date-Tamarind Chutney
Dissected Bread Pakoda! :)

New pic added on 09/02/2014

Saturday, May 19, 2012

Maka Bhaja (American Corn fry called these days...)

This corn fry is my mom's recipe. Maka is the Odiya word for Corn. Bhaja is the Odiya word for shallow-fry. She used to make this for us an evening snack. We used to only get in particular months of the year in Odisha - so when it was available, eat as much as you can. And I used to love this particular preparation, not just for it's awesome flavor and taste but also because this did not require me to put any effort in eating the kernels off the corn! ;)

A few years back during one of our India trips, we realized that there was a big craze for American Corn fry as an appetizer when eating out. Everyone was going gaga about it. We decided to try it out and R's humorous take on it was "Ohho..it's just Maka Bhaja" :) It still intrigues me why people refer to it as "American"..wonder if it is the next American Chopsuey that only exists in Indo-Chinese cuisine! Ok maybe coz it is the young corns whereas we are used to eating the slightly mature corns after roasting it in flame. But then it could have been called "Kancha Maka Bhanja"..ofcourse that does not sound as trendy! Anyways, there are better things to worry about..so, enjoy the recipe!


Ingredients 
3-4 servings

Canola oil - 1 tbsp
Corn heads - 4
Onion - 1/2 big, thinly chopped
Fresh Green Chilli - 1, chopped
Cumin seeds - 1/2 tsp
Mustard seeds - 2 pinch
Fresh Curry leaves - 4-5
Turmeric Powder - 1/2 tsp
Asafoetida (Hing) - a pinch
Salt - as per taste
Coriander Powder - 1 tsp
Lemon juice of 1/2 small lemon

Method

Take the fresh corn heads. Clean the hairs left on them, if any.
Holding the corn in your left hand with the utensil underneath. With your right hand, take a knife and start cutting out the kernels from the corn. Takes a few strokes to get all the kernels. Some people can just use their hands to pull off the kernels - not me!


Start the cooking by heating the Canola oil.
Add the Mustard seeds.
Once they sizzle, add the Cumin seeds and fresh Curry leaves.
As the Mustard seed crackles by now and the smell of the Curry leaves is encompassing your kitchen, add the chopped Onions and Green Chillies. Stir and mix.
As the onion starts turning translucent, you can add the Hing. Stir it to mix up.
Add the Turmeric powder and Salt after a few seconds. Mix it well.


Depending on how crunchy you want the Onions to be, appropriately add the already chopped corn kernels as shown in the pic.
Mix well and let it cook in Medium-High heat.
As the corns look half-cooked, add 2-3 tbsp of water and mix it well. Cover it and let it cook in Medium heat.
Once the corn look cooked, add the Coriander Powder and Lemon juice. Mix it well and cook for 2-3 more minutes to make it crunchy.
You can garnish it with fresh chopped Coriander leaves for added flavor. I did not when I prepared this.

You can have this as an evening snack. Or as an item with bread \ Chapatti.

Wednesday, April 11, 2012

Nan Khatai

When I urgently needed the recipe for Nan Khatai to take as a gift when visiting a relative, I came across this recipe. It turned out the way I used to make earlier on and had lost the recipe. Thanks, Vaishali, for sharing your MIL's much coveted recipe here - she sounds like my mom who has her own rules for cooking. I am not complaining - we have always got some terrific food out of her kitchen! :)


Ingredients: 
Makes approx. 20 biscuits (as shown in pic)
  • 1 cup White flour (Maida)
  • 1/2 cup Brown Sugar (White sugar is also ok)
  • Ground Cardamom Powder - 1 tbsp
  • 1/2 tsp Baking Powder
  • Pinch of salt
  • 6 tbsp Ghee (I used home-made Ghee from butter)

Method: 

  • Mix the dry ingredients - Flour, Sugar, Cardamom Powder, Baking Powder and Salt.
  • Add the Ghee (preferably room temperature) to the above. Knead the dough - it will be like the dough meant for roti\paratha, slightly more wet. Keep it aside for a few mins to an hour.
  • Preheat the oven to 350°F (or 180°C).
  • Divide the dough into 20 equal portions. Shape those portions into oval shape balls. Place an almond or any other nut of choice as decoration.
  • Arrange them on the baking sheet giving them enough space to expand and bake evenly.
  • Bake in the pre-heated oven for approx 15 minutes. Keep a close watch for the first batch coz every oven differs and you don't want to burn the nan khatais.
  • Take them out of the oven immediately and let them cool. I move them to a different tray to stop the baking process sooner.
  • Store in an air-tight container if you manage to keep some for later. ;)


Enjoy the snacking!

Update on 04/13/2012:

This  goes to Surabhi's event "Let's Part Every Month" with this month's theme being "Snacks".The event page is here. Check out all the wonderful posts her event has received!

Wednesday, March 7, 2012

Sprouting...

Hey All!

I have always got a taste for sprouts. But never got around to making some on my own. Lately due to health issues and the need to include more healthy foods in our diet, sprouts are the first that got added to my menu. My friend Meenal's mother recommended Methi (Fenugreek) seeds sprouts since they have innumerable medicinal benefits and very good for controlling blood sugar spikes. While waiting to lay my hands on Methi seeds, have started eating Moong sprouts.


My Maiin (Mami aka mother's brother's wife) used to serve sprouts to us when we were kids. That is the first recollection I have of ever having sprouts. If I remember right, she used to make it as a salad and serve for breakfast with lot of other delicacies. I have come a long way since then since the Moong sprouts alone are sufficient for a filling breakfast now. On a side note, I always think my Maiin should write books on natural remedies - wish she does some day! Much like how I wish my mom would write an Oriya cooking book - I can only hope someone will listen to me "some" day! :)

Right now, I have about 1/4th cup of sprout every morning before heading for work. It keeps me satiated till I reach work and have my proper breakfast. This way, I am not filling myself up with some sugary granola bar! To be honest, it took some learning and patience to get sprout-making right. Even though it is a very simple process, I am sharing it here just in case there are more people like me with similar mental-blocks!


Ingredients:

1/2 cup of whole Moong (green gram lentil) gives me about 1.5 to 2 cups of sprouts which lasts me for 3-4 days

Process:

Soak the Moong in water in the morning before heading for work.
In the evening, drain the water and keep it in a dark place like a shelf or oven.
Note - Avoid Moong sprouting in well-lit places or it will turn bitter - I leave it inside the oven.
By the next evening or the day after, you will have well-sprouted Moong beans.

My joys had no bounds the first time I managed to get those long juicy sprouts! Happy sprouting! :)

Sunday, October 26, 2008

Delicioso Bhelpuri aka Mudi Masala


Ingredients

Bhel Mix - 2 cups (Tip - You can get these in Indian stores. If you can't find it, use plain Bhel\Mudi\Muri with some mildly spicy mixture)
Onion - 1/2 small
Tomato - 1/2 small - deseeded, just use the flesh
Green chilli - 2-3
Coriander Chutney - 1 tbsp ( I use Swad brand)
Sweet Tamarind Chutney - 2 tbsp (I use Swad band)
Coriander leaf - a few sprigs
Boiled Potato - 1 small, chopped into tiny cubes

Mix them all together and serve immediately. Yes, you are done! :)


A no-cook recipe..always convenient to make when you get guests suddenly or if you are out on a picnic. You can increase or decrease the ingredients based on your taste and preference.

This is known commonly as Bhelpuri - a savoury snack from Bombay Chowpatty - seaside snack stalls. It is widely known as Mudi Masala or Jhal Mudi in Odissa - a slightly different version. The crunch of the onion, softness of the tomato and potato with the spiciness of the chutneys make it an irresistable lip-smacking snack..slurp!!

I first learned of this particular combination from my dear friend Vaishnavi during one of our many cherished barbecue get-togethers. Thanks, Vaish!

Saturday, November 3, 2007

Yummy Masala Pav Bhaji

Pav Bhaji - a fast food that goes equally well as a lunch or dinner item. Isn't that a live-saver! :)How many times it has come to my rescue when I felt too lazy to cook!

I loved the analogy in Wikipedia entry for Pav Bhaji what states that "The connection of pav bhaji is to western India is similar to what pizza is to Italy or the hot-dog is to America. ". And whoever thought of calling these "Indian Sloppy Joes"..ha ha. Well, they are right in a way! An interesting article that chronicles the history of Pav Bhaji is here.

Well, I should mention that even though I had been making Pav Bhaji before, my dear friend Meenal's tips have definitely taken it to a completely different level. Thanks, Meenal! I can never forget how we gobbled the Pav Bhaji prepared by her on our Wintergreen Resorts (Virginia, US) trip. This is a mountain resort and we did a lot of walking around in the morning. So you can guess how hungry we were and to add on, hot yummy Pav Bhaji for lunch -- it just doubled our appetite and we just gobbled and gobbled :) (Gobble, gobble, gobble - Remember "Everybody Loves Raymond" episode where the twins are teasing their sister). Coming back to the topic, here is my version of Pav Bhaji recipe.


Ingredients (makes 6 servings)

Potatoes - 4, boiled and mashed
Onion - 2 large, chopped
Ginger - 2 tbsp, grated
Tomato - 1 large, chopped
Tomato Paste - 1/2 can of 6 oz. can
Green Peas - 1/2 cup
Jalapeno/Peppers - as per taste (optional)
Cauliflower florets - 1/2 cup boiled (optional)

Pav Bhaji Masala - 3 tbsp (I use MDH brand, thanks to my friend Meenal!)
Turmeric Powder - 1/4 tsp
Coriander Powder - 1 tsp
Garam Masala - 1 tsp
Salt - 1 tbsp or as per taste
Cumin seeds - 1 tsp
Dry Bay leaves - 2
Sugar - 1/8 tsp
Canola oil - 1 tbsp

Garnishing Ingredients

Chopped Coriander Leaves - few sprigs
Onion - 1 large, chopped
Lemon Wedges
Butter

Masala Pav Ingredients

Pav or Bun
Butter
Pav Bhaji Masala

Boil the potatoes and cauliflower and mash it.

Heat oil. Temper with sugar, cumin seeds and dry bay leaves. Add chopped onion and let it cook till it is transparent but not brown. Add grated ginger paste and let it cook. Once the ginger is cooked, add the chopped tomato. Once it is slightly cooked, add the tomato paste, turmeric powder, coriander powder, garam masala, salt and the Pav Bhaji Masala. This provides the orange enchanting color to the bhaji. Add mashed potatoes and cauliflower and mix well. Add the green peas and chopped jalapenos to the mixture. Add 1/2 cup water at a time to get the desired consistency. We prefer it a little bit runny, not exactly dry. Garnish with chopped Coriander Leaves, chopped onion and a lemon wedge. A dash of butter also as garnish enhances the taste.

Melt some butter. Sprinkle Pav Bhaji Masala and mix. Toast the bread in this butter.

For a different take on Pav Bhaji, check Nupur of One Hot Stove's version. Link here.

Sunday, September 30, 2007

Khaman Dhokla

Dhokla has been favorite Gujrati food since childhood. Ever since I started cooking, I have made several attempts at it..need I say unsuccessful attempts!! :) Then I stumbled across Jai and Bee's Khaman Dhokla recipe on Jugalbandi. Thank you, Jai and Bee! Below is the same recipe with minor modifications.

Note - The ingredients are spread across the post till the end. Please make sure to read the entire post for all the ingredients.


Ingredients (serves 3 or serves 1 if it's me)

Besan - 1 cup
Canola Oil - 1 tbsp
Salt - 1/2 tsp
Lime juice - 1 tbsp
Green chilli - 4 chopped
Water - 1/2 cup

Mix all the ingredients together and keep aside. This will be a thick batter.

Lemon Eno - 1 tsp

Just before you put the above mixture in the presssure cooker without whistle (just for steaming), add the Eno and mix it well quickly. It will develop a whitish color.

Take an utensil and spray it lightly with oil. I use the Pam Spray. You can use Canola oil as well. Drop the above mixture in this utensil and let it settle down evenly. You don't need to mix anything now.

Add some water to the pressure cooker to develop steam. Place the above container with the dhokla mixture inside the pressure cooker with the water surrounding it. Pressure cook on Medium-High heat for 15 mins without whistle. After 15 mins, put off the heat and let the pressure cooker rest as is for the next 5 mins. Take out the container and temper it with the tempering ingredients.

Tempering ingredients

Canola oil - 1 tsp
Mustard seeds - 1 tsp
Curry leaves - 5-6
Water - 2 tbsp
Sugar - 1 tbsp
Lime juice - 2 tbsp
Fresh coriander leaves - few sprigs chopped

Heat oil. Add mustard seeds and curry leaves and let it crackle. Add this to a mixture of water, sugar and lime juice. Mix well and add to the prepared khaman dhokla cake.


Enjoy with pudina chutney or dhaniya chutney.

Sunday, September 2, 2007

Noodles with Spicy Chicken Pakoda

Spicy Chicken Pakoda is one of the most popular street-food item of Bhubaneswar, Orissa. Other mouth-watering delicious street-foods include:

  • gup-chup (alias gol-gappa, hot pani-puri),
  • chicken egg rolls (hot and spicy chicken in a wrap),
  • kachodi chat,
  • dahi wada-aloo dum,
  • hot guguni (yellow peas curry)
School lunch-time or end of the school day - The parents can be late to pick up the kids, but the street vendors promptly position themselves near the school entrance. No matter how much you try, you can never avoid the enticing smell of the goodies. You will succumb to it irrespective of how hygenic or unhygenic it is. Irrespective of how often how your dad has tried to explain and convince you to avoid eating it. Your's truly used to do so. Even in spite of the fact that her mom is a wonderful cook and can recreate the exact same taste at home! :)

Fast forward to the present day - These items are in the first list of items to eat on India trip. Some things never change!

Noodles (Makes 3 servings)

Ingredients

Oriental style noodle (I used Tomoshiraga Somen) - handful
Canola oil - 1/2 tsp
Eggs - 3
Large onion - 1 cut into thin slices
Green Beans - 12 pieces cut at an angle into small pieces
Carrot - 1 cut into long pieces (optional)
Ajinomoto - 1/4 tsp
Soya sauce - 1 tbsp
Worchestire sauce - 1 tsp
Green chilli sauce (I used Chings brand) - 1 tsp

Step 1

Boil water. Add an handful of the vermicelli. Let it cook al dente. When cooked, put it in a strainer and wash it with cold water. Keep it aside so that all the water is drained from the vermicelli.

Step 2

Heat canola oil. Cook onion till it is just cooked. Don't let it turn golden brown. Keep it aside.

Chop green beans at an angle. Cook it while keeping it crunchy. Keep it aside. You can keep it in the same container as the onion since you will mix them all together.

You can also add carrot cut into long thin slices. Cook it while keeping it crunchy (similar to the green beans above). Keep it aside. I did not use it.

Heat a few drops of oil. Break the eggs into the pan and stir it so that the 3 eggs are mixed up. Stir it occasionally and finally break them into small chunks. Keep it aside.

Step 3

In the hot pan, add the boiled vermicelli. Add the cooked onion, cooked beans and scrambled eggs and mix. Add ajinomoto along with soya sauce and worchestire sauce. Add green chilli sauce (I used Chings brand). Use more if you like it more hot. Mix well. Caution - Do it slowly so that you don't mash up the noodles.

Spicy Chicken Pakoda (Makes 4 servings)

Ingredients

Chicken - 1 lb, cut into small pieces
Corn flour - 2 tbsp
Flour - 4 tbsp
Coriander powder - 1 tsp
Garam Masala - 1 tsp
Sweet Paprika - 1/2 tsp (I used McCormick's brand)
Baking soda - 1/4 tsp
Fresh ginger paste - 2 tbsp
Shan Tandoori Chicken BBQ Mix - 1 tbsp
Salt - 1.5 tsp or as per taste

Step 1

Mix all the ingredients together and keep aside for 30 mins.

Step 2

Deep-fry the chicken pieces. Drop the chicken pieces one at a time into the oil.


To serve as a snack, garnish it with fresh onions and a pinch of rock salt (optional). Or combine it with fried rice or noodle and savour as a meal.