Anytime we travelled between Cuttack and Bhubaneswar on National Highway 5, we used to stop by Pahala village. On the side of the freeway is a set of eating places where they serve fresh rasagolla and chennapoda. A nice detailed article on Pahala sweets is available here. This place has not changed a bit in past years, irrespective of their popularity and demand.
Miss the earthen pots in which they serve the sweets :( In the present age of recycling, aren't these earthen pots real cool? And they add such a nice grandeur and ethnic feeling to the food.
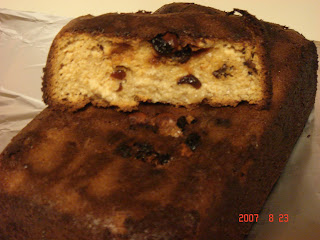
This is a modern version of the age-old recipe adapted to the NRI-Odiya's kitchen. :) I learnt this recipe from my SIL first. After a series of mishaps and experimentation failures, I finally found the correct proportion of the various ingredients. A sweet-dish that you can easily prepare irrespective of the number of people. Just mix everything and let it bake! Here you go...
Ingredients (makes 2 cakes, about 25-30 pieces)
Ricotta cheese - 3 lb
Sweetened Condensed Milk - 14 oz
Light brown sugar - 15 tbsp
Butter - 4 oz (1 stick)
Semolina\Rava - 10 tbsp
Cashewnuts - 1\2 cup or as per your taste
Raisins - 1\2 cup or as per your taste
Melt the butter.
Mix all the above together by spatula. Keep moving the spatula in either clockwise only or anti-clockwise direction only.
Pre-heat oven to 350F. Line the baking tray with butter paper or spray on lightly with canola oil before pouring the mixture. Fill the baking tray to 3/4th of its height with the mixture to let it rise. Bake for 1hrs. (2/8/08 -- Better texture if cooked for 1 hr instead of the earlier post requiring 1.5 hrs)
Let the trays remain in the oven for another 10 mins so that the outer crust gets time to burn lightly and become dark-brown in color while the inner stuff remains white.
Poke a knife or pointed edge into the cake. If the knife comes out clean, the cake is ready. Else let it bake for a few more minutes.

Note - Once cold, store in the refrigerator. Before eating, if you want it warm, microwave the piece for a few seconds.
13 comments:
what an easy recipe..must try
The cake looks divine...have bookmarked the recipe. :)
That is such a nice cake/sweet. Good to learn a little bit about Oriya cuisine through here.
Thanks for sharing.
Looks lovely.
Great recipe, I love the cheese cakes in any form:))
Lovely recipe, it is on my list to do. thanks for sharing
Rajitha, Tee, TBC, Raaga, Asha, Saju -- Thanks for the lovely comments. You made my day. Do let me know how it turns out. Have a great Labor day break.
Hey, you're from my home town girl! And I did the exact same thing while on NH 5. Pahala...you blink and you miss this tiny village, don't you??
But its been ages since I've been there.
I've bookmarked this recipe for this holiday season.
all the best,
Hi Anita, Great to hear from a fellow Bhubaneswar-ite :) I swear..it is so easy to miss Pahala! It's still the same, don't worry. Only that I saw it 3 years back..but NH5 has become so so so much better now. Keep visiting. Hope you enjoyed this during the holidays.
Wonderful recipe Pragyan, tried it again and loved it!:)
-Siri.
Hey Siri - Great to hear from you online! :) Glad you loved it! :)
Thank you for linking such a yummy recipe to my collection!!!
You have a lovely space!!
Thanks, Divya! You have a nice blog too!
Post a Comment